
How to Install a Toilet Paper Holder
Transforming your bathroom into a more organized and functional space can be easier than you think. One small yet impactful project you can tackle is installing a toilet paper holder.
Whether you’re a DIY enthusiast or just someone looking to add a touch of convenience to your bathroom, this guide will walk you through the steps to install a toilet paper holder effortlessly.
With a few tools, some patience, and a little know-how, you’ll have your new fixture up and ready in no time. Let’s get started on this straightforward home improvement project that will make your bathroom experience more pleasant and efficient.
How to Install a Toilet Paper Holder
Prepare for the Project
- Gather Your Tools: You’ll need a tape measure, pencil, painter’s tape, drill, screwdriver, and a level. The toilet paper holder you choose will come with the necessary hardware.
- Types of Toilet Paper Holders: Single-Post Holder: This is the easiest to install. It only requires one bracket, no need for a level, and minimal drilling. Some have fixed posts, while others have a swing arm that can extend to fit a larger, double roll.
- Double-Post Holder: This needs two sets of brackets and includes a spring-loaded rod. Pivot-style holders also require two brackets but have an attached bar on one side that lifts for loading a new roll.
- Quick Solution: Freestanding or Standalone Holders: For a super quick fix, consider these. They don’t require any tools or installation.
Gather Tools
- Gather Your Tools: Grab a pencil and a tape measure. Sit down and measure the distance from the toilet bowl to the wall or cabinet where you’ll install the holder. Make sure you can easily reach it.
- Determine the Distance: For most people, the holder should be 8 to 12 inches from the toilet bowl.
- For children or shorter individuals, 8 to 9 inches is best.
- For taller users, aim for 10 to 12 inches.
- Measure for Height: The holder should be 26 inches from the floor to keep it at arm level.
Tip: If you’re installing for someone who may need extra assistance, follow the ADA (Americans with Disabilities Act) guidelines. Place the holder 7 to 9 inches in front of the toilet bowl and between 15 to 48 inches above the floor.
Using a Template for Installing a Toilet Paper Holder
- Template Guide: Most toilet paper holders come with a simple template that you can tape to the wall using painter’s tape. This template will help you see exactly where to drill.
- Attach the Template: Follow the height and distance measurements you made earlier. Tape the template to the wall in the correct position.
- Marking Drill Holes:
- For a single-post holder without a template, hold the bracket in place and use a pencil to mark the drill holes.
- For a double-post holder, mark the left bracket’s drill holes first, then use this mark to find and mark the drill holes for the right bracket. Each bracket needs two drill holes.
Making Sure Your Toilet Paper Holder is Secure
- Check Your Marks: Use a level to ensure your pencil marks and template are perfectly straight.
- Create a Guide: Use a small nail to make an indentation on the pencil marks. This helps guide your drill and prevent slipping.
- Choose the Right Drill Bit: Make sure your drill bit is the same size or a bit smaller than the screw shank for a snug fit.
- Drill into a Wall Stud: If possible, drill into a wall stud for extra stability. If you’re drilling into sheetrock, insert wall anchors before the screws for a secure hold.
- Drill into Tile: Mark your drill holes as needed. Use a masonry bit and drill slowly to avoid cracking the tile. Gently tap in wall anchors with a hammer and insert the screws carefully.
Attaching the Mounting Brackets
- Secure the Brackets: Start with the left-side bracket for a double-post holder. After that, you’ll be more confident with the right side.
- Position the Bracket: For both types of holders, place the bracket on the wall over the drill marks with the arrows on the bracket pointing upwards.
- Screw in the Bracket: Use a screwdriver to guide the screws into the holes and secure the bracket to the wall.
- Repeat for Double-Post Holders: If you have two brackets, repeat the process on the right side.
- Attach the Posts: Slip the posts over the brackets for a snug fit.
And there you have it! Your toilet paper holder is now securely mounted.
Securing the Holder
Some toilet paper holders have a small screw hole at the bottom of each cover. This set screw helps keep the holder from coming loose with frequent use. Use an Allen wrench or hex key to tighten the set screw, ensuring everything stays in place securely.
Placing the Toilet Paper Roll
- Single-Post Holders: Simply slide the roll onto the arm.
- Spring-Loaded Holders: Place the roll on the roller and snap it in, one side at a time.
- Pivot-Style Holders: Lift the arm, slide the roll on, and lower the arm back in place.
How To Install a Toilet Paper Holder Without Screws
- Select the Holder: Choose a toilet paper holder that uses adhesive for installation. These come in various styles and materials.
- Prepare the Surface: Clean the area where you’ll mount the holder with a mild detergent or cleaner. Ensure the surface is completely dry.
- Apply Adhesive: Follow the instructions for your adhesive strips or hooks. Peel off the backing and firmly press the adhesive onto the wall.
- Mount the Holder: Attach the toilet paper holder to the adhesive strips or hooks, pressing firmly to secure it.
- Allow Time to Set: Let the adhesive set for the recommended duration before using the holder to ensure a strong bond.
How To Install a One-Arm Toilet Paper Holder
- Gather Your Tools: You’ll need a drill, screws, a pencil, a level, and measuring tape.
- Pick a Spot: Choose a spot that’s easy to reach, usually 26 inches from the floor and 8-12 inches from the toilet.
- Mark the Holes: Hold the mounting bracket where you want it. Use a pencil to mark where the screws will go.
- Check for Level: Use a level to make sure your marks are straight.
- Drill the Holes: Drill holes where you marked. If it’s drywall, use wall anchors for extra support.
- Attach the Bracket: Screw the mounting bracket to the wall. Make sure it’s tight and level.
- Install the Holder: Place the one-arm holder onto the bracket. Tighten any screws needed.
- Test It: Make sure the holder is secure and can hold a roll of toilet paper.
Installation Height of Toilet Paper Holder
Standard Height for a Toilet Paper Holder
Ideal Height: Installing a toilet paper holder is important for convenience. The standard height is around 26 inches (66 cm) from the floor, and the distance from the toilet is typically 8-12 inches (20-30 cm).
Types of Toilet Paper Holders:
- Single-Post Holder: Easiest to install, requires one bracket.
- Double-Post Holder: Needs two brackets and comes with a spring-loaded rod.
- Pivot-Style Holder: Similar to double-post but has an attached bar on one side.
Size Considerations:
- Public Washrooms: Larger holders, around 12″ x 16″ (30 x 40 cm), for large rolls.
- Home Use: Smaller holders, about 20 x 16 x 6 cm, for standard rolls.
Installation Methods:
- Suction Cup: Easy but may fall if not strong enough.
- Hook: Needs good-quality hooks.
- Nail: Most solid method.
- Glue: Direct way to fix the holder on the wall.
Steps to Install a Toilet Paper Holder:
- Choose the right position and mark the holes.
- Drill the holes using a 6mm bit.
- Insert the expansion bolt.
- Fix the brass gasket with a screwdriver.
- Measure the pitch hole of the holder and mark the same horizon line.
- Drill and install the second gasket.
- Attach the holder to the wall and fix the bottom screw with a hexagon wrench.
ADA-Compliant Toilet Paper Holder Height
The ADA (Americans with Disabilities Act) guidelines recommend that toilet paper holders be installed between 19 and 26 inches from the floor. This height range ensures accessibility for individuals with disabilities, including those in wheelchairs. Additionally, the forward edge of the toilet paper holder should be within 36 inches of the back wall to make it easily reachable. Following these guidelines helps create a bathroom that is inclusive and user-friendly for everyone.
Choosing the Best Paper Towel Holder
Why It Matters: A paper towel holder is essential for every home. There are various materials and styles available, and choosing the right one can make a big difference.
Materials
- Plastic: Light, colourful, and affordable. However, they have a poor bearing capacity and can easily deform or break. Suitable for short-term use.
- Wood: Eco-friendly and natural, but not mildew-resistant. Not ideal for humid environments.
- Metal: Durable and sturdy but can be bulky and have sharp edges. Copper is the best among metals, being waterproof and giving a classic look after electroplating.
Styles
- Wall-Mounted: Available as built-in or outlay holders. Some come with shelves for added convenience.
- Table-Top: Also known as standing holders, they are easy to move and place anywhere.
Finish
- Quality finishes, like oil-rubbed bronze, polished brass, and brushed nickel, enhance durability and aesthetics. Look for a smooth, shiny, and wear-resistant surface.
For Bathrooms
- Choose waterproof designs to keep paper towels dry and clean. Copper holders are the best for humid places like bathrooms.
Tips for Installation
- Follow the instructions for installing different styles and materials. Use appropriate tools and methods to ensure durability.
By considering these factors, you can choose the best paper towel holder that meets your needs and preferences, ensuring convenience and style in your home.
Selecting a Paper Towel Holder for Different Occasions
When choosing a paper towel holder, it’s important to select the right type for each situation. Here are some key areas where we often use paper towel holders:
Bathroom
Bathrooms are typically wet environments. To keep paper towels dry, choose holders with shielding designs or made of waterproof materials like stainless steel or plastic. A shelf design can also be handy for keeping phones safe from water.
Kitchen
Kitchens are usually crowded with utensils. Opt for simple, lightweight plastic holders that don’t take up floor space. Make sure to keep them away from fire and water sources.
Dining Room
A table-style paper towel holder is ideal for dining rooms. It’s easy to move around and can be relocated after use. Wooden holders are a great match if your furniture is also wooden.
Commercial Spaces
For hotels or commercial areas, choose sturdy and functional holders that can handle high usage.
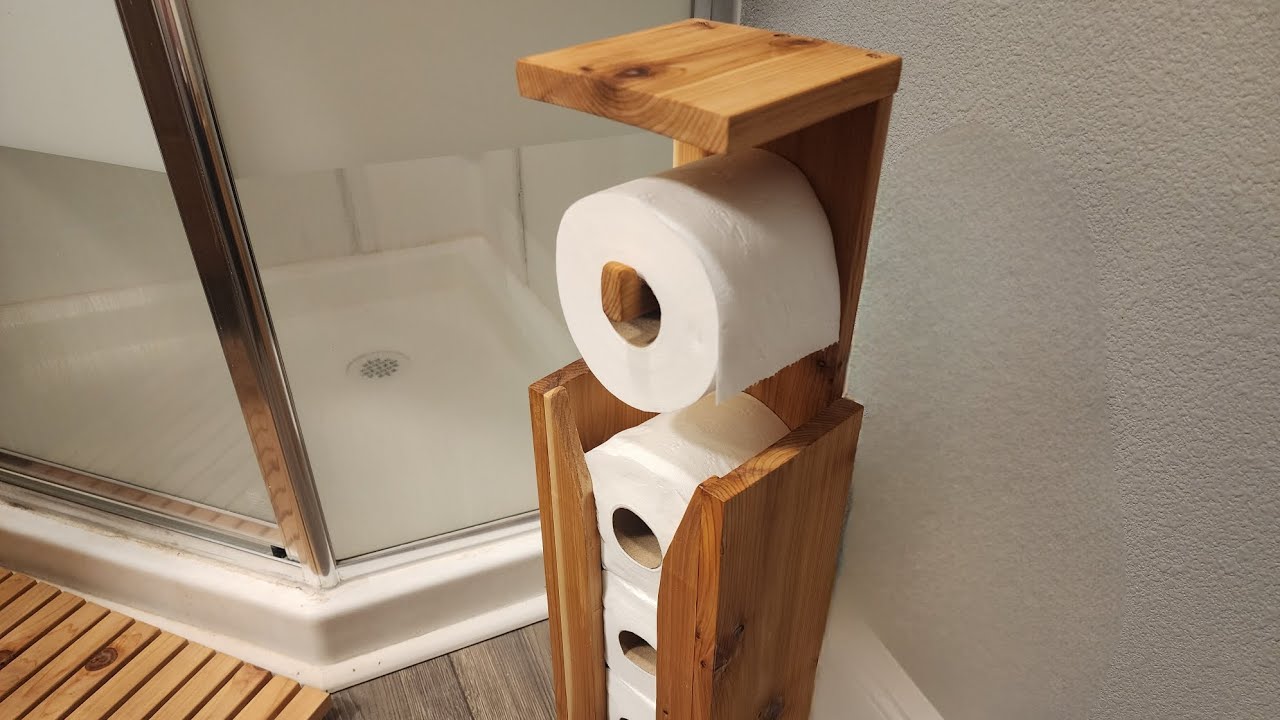
DIY Double Toilet Paper Holder
Do you find toilet paper holders useful? Without one, toilet paper can easily fall to the ground and get dirty. Let’s create a DIY paper holder using waste cement and cardboard to keep the toilet paper stable and clean.
Materials Needed
- Cement
- Waste cardboard
- Reinforced bar
- Two tubes (different sizes)
- Hot melt adhesive
Steps to Make Your DIY Holder
- Prepare the Cardboard: Cut discarded cardboard boxes into small pieces. Use hot melt adhesive to glue them together until the holder is tall enough for a standard toilet paper roll.
- Create the Hole: Use tools to make a hole in the cardboard large enough for a roll of toilet paper. Place the larger and smaller tubes inside and pour cement into them.
- Remove the Tubes: Once the cement dries, pull out the tubes to ensure the holder can be used properly.
- Seal with Cement: Use a bent steel bar and cement to seal the position of the smaller tube. This can be used to hold toilet paper, as well as other items like mobile phones.
- Attach to the Wall: Secure the holder to your bathroom wall with screws.
- Finishing Touches: If the cement surface is rough, use sandpaper or a polishing machine to smooth it out. You can also decorate the holder with your favourite designs.
What is the Best Toilet Paper?
Choosing the best toilet paper depends on personal preference, but here are some popular options and their features:
- Ada Paper Towel Dispenser: Convenient for kitchens and bathrooms, easy to use.
- Wall Mount Paper Towel Holder: Saves counter space, ideal for kitchens.
- Commercial Toilet Paper Holder: Large capacity for public restrooms.
- Free Standing Toilet Paper Holder: Portable and easy to place anywhere.
- Toilet Paper Holder With Shelf: Extra space for phones or other items.
- Oil Rubbed Bronze Toilet Paper Holder: Stylish and durable.
- Animal Toilet Paper Holder: Fun and unique design.
- Vertical Toilet Paper Holder: Saves space, and a modern look.
- Pivoting Toilet Paper Holder: Easy to change rolls, sleek design.
- Ceramic Toilet Brush Holder: Adds a touch of elegance to the bathroom.
- Cat Toilet Brush Holder: Cute and playful design.
- Toilet Paper Holder Stand: Versatile and easy to move.
- Toilet Paper Holder Ideas: Various creative and practical designs to suit different tastes and needs.
Recommendation
Flush Valve Seal Replacement: A Simple Guide to Fixing a Running Toilet
How to Replace a Toilet Flapper: A Simple Guide to Fixing Leaks and Saving Water
How To Replace A Bathroom Sink?
Why Your Toilet Won’t Flush? Main Causes And Solutions
Small Toilet Ideas – 50+ Best Toilet Designs
Complete Guide to American Standard Toilet Flappers: Types, Replacement, and Maintenance
Conclusion
Making your bathroom more organized and functional is easier than you think. One small but impactful project is installing a toilet paper holder. Whether you’re a DIY fan or just want to add convenience, this guide walks you through the steps effortlessly.
With a few tools, some patience, and basic know-how, you’ll have your new fixture up and ready in no time. This simple home improvement project will enhance your bathroom experience, making it more pleasant and efficient. Let’s get started and make your bathroom a more organized and functional space!
FAQs
Q: How to attach a toilet roll holder to tiles?
A: If you’re drilling into tiles, start by placing the plug into the hole and gently tap it in with a hammer until it’s 2-3 millimetres below the tile surface. This prevents the plug from expanding and cracking the tile. After that, check to ensure the bracket is level once more. Finally, secure the wall bracket in place by screwing it in. By following these steps, you can safely and securely attach items to tiled surfaces without damaging the tiles.
Q: Where do you put a toilet paper holder in a tight space?
A: Just hang it over the toilet tank, and you’re all set. It’s practical and keeps your toilet paper within easy reach, making your bathroom experience smooth and convenient.
Q: Can you glue the toilet roll holder to the wall?
A: Yes, you can glue a toilet roll holder to the wall using strong adhesive products like construction adhesive or epoxy. First, choose a suitable adhesive for your wall type (tile, drywall, etc.). Make sure the wall surface is clean and dry before applying the adhesive. Next, apply a generous amount of adhesive to the back of the holder, then press it firmly against the wall, holding it in place for the recommended time. Allow the adhesive to cure completely before using the holder. Glueing a toilet roll holder is a convenient option if you want to avoid drilling holes in the wall.
